

This cake was made for Easter this year, I just never got around to posting it- things have been so busy! The cake is a Dark Chocolate Stout cake from a recipe that I found here and tweaked.
The heavenly, almost gooey cake with its ever-so-subtle bitterness is a perfect contrast to a sweet peppermint buttercream frosting that sort of dances around on your tongue as it mingles together. Deep, dark, bittersweet cake and creamy, sweet, minty frosting- what more could you ask for? Oh, probably the recipe, huh?
Without futher ado, I give you the recipe for Dark Chocolate Stout cake with Peppermint Buttercream as a bonus to a mini tutorial on how to make your cake look as pretty as a picture.
Also, don't be scared if you're making buttercream for your first time. This was my first time, too, and it turned out just fine. Aside from the horrifying reality that it's just made of butter and sugar.
DARK CHOCOLATE STOUT CAKE WITH PEPPERMINT BUTTERCREAM
makes: one 9" round cake
takes: 1hr. to bake, about 1 hr. to decorate
YOU WILL NEED:
For the Cake:
1 c. Dark Chocolate Stout (you get to drink the rest- yay!)
1 c. butter
3/4 c. cocoa powder (this one is the best I've ever tried)
1 1/4c. sugar
2/3 c. sour cream
2 eggs
2 c. all-purpose flour
2 1/2 tsp. baking soda
For the Frosting:
(just beat these together in mixer until combined to make buttercream)
1 stick butter
3 cups powdered sugar
1/2 tsp. peppermint extract
1. Preheat the oven to 350'F.
2. In a saucepan over low heat, melt butter and beer together, whisking occasionally.
3. Remove from heat. Add cocoa and sugar and whisk together.
4. Beat together eggs, sour cream, and vanilla, then add to cocoa stout mixture and whisk together.
5. Whisk flour and baking soda together, then add to batter mixture. Grease a 9" spring form pan (I like to mix equal parts melted butter and flour and paint it in with a pastry brush) and pour cake batter in.
6. Bake for one hour, or until a toothpick comes out of the center clean. Allow to cool completely before frosting.
Now, on to the decorating! First, coat the cake with a crumb coat and put it in the refrigerator for 30 minutes to firm up. Then do a second smooth coat of frosting. It will be easier to decorate the rest if you place it back in the fridge for 30 minutes to an hour. This will cause the frosting to harden somewhat and it's much easier to fix any mistakes that you make and the frosting sticks better to the cake.
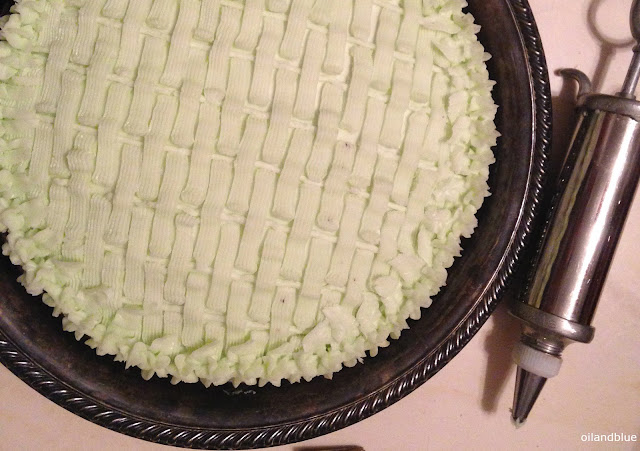
Start with a round tip and make vertical lines down the cake about one inch apart.
Next, put a flat basket weave tip on and begin by starting just at the edge of one of the piped lines and go over the piped line below it, stopping at the edge of that piped line. Begin at the top and move across and down as you go so that you aren't putting your hand in your work. Just continue going over every other piped line to create the basket weave illusion.
To finish the sides, put on a star tip and make simple stars around the edge and over the sides by gently squeezing frosting out onto the cake and lifting straight up once it has stuck. I added a row of leaves around the edge as well by squeezing some frosting out against the stars and pulling the tip towards the center of the cake while squeezing out more frosting. Just stop squeezing and twist the tip to the right or left to make the leaves end. Lastly, I added a few pink "roses" here and there to make it more cheery. These were done the same way as the stars, just with a smaller tip.
Now, sit back and let the compliments roll in! You're now a regular Betty Crocker!
P.s. Don't worry if it's not perfect. You can tell that I made some mistakes and accidentally ripped off some piping here and there, but don't worry- you can cover it up with flowers later!
No comments:
Post a Comment