

Don't replace an outdated ceiling fan- those suckers are expensive! Instead, consider painting it a different color. I'm not a huge fan (haha, so punny) of the spray-paint-everything-in-sight-watch-out-pets-and-small-children-nothing-is-sacred pinterest-fueled trend of using a can of paint to fix your decorating woes, but in small doses it can do wonders. In the 1990's the ceiling fans in our house would have been glorious. In a 100+ year old Victorian house, though, our shiny look-at-me brass ceiling fans were woefully out of place. The Man let me know that replacing them with a regular light fixture was out of the budgetary and reasonable things question- he's definitely my voice of reason. Plan B: paint the ceiling fans! Weee!
There was one little catch- I couldn't take them off of the ceiling if I wanted to do this myself, and I wanted to do this myself. For one, I don't trust myself with electrical things. After I electrocuted myself just by hanging wallpaper (who does that?!), I didn't feel like tempting fate. Secondly, I have the arm strength of a 5'2" T-Rex. Holding up a fan motor while removing it from the ceiling and standing on a ladder that has a leg nearly chewed off by a squirrel because we left it outside once would also be tempting fate. So, I figured out a way to paint it nicely while it was still attached to the ceiling.
Click through below for the how-to steps and the before and after (hooray for actually remembering to take before and after pictures!).
First, you will need to remove the fan blades. This is pretty easy, it's just tricky to get your hand twisted up there and unscrew the three screws holding them on without getting a mouth full of dust bunnies.
Set your removed blades off to the side and marvel at how gross they are. In my defense, we just moved to this house a year ago, so most of this is other people's dust. This is totally normal, right?
Next, I would recommend cleaning them. And then marveling as they change color and fill your rags with gray dust bunnies and gross stuff. Some of it is moon dust, you know, so that makes it a little more okay...

You'll be painting soon, so gather your arsenal: Spray paint, masking tape, newspaper or a plastic drop cloth, and definitely some sort of mask and goggles. Spray paint is nasty stuff- open the windows, turn on a fan, keep the pets and children out of the room. Air the room out afterwards, too. Safety first!

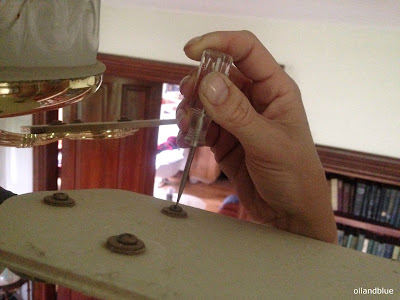
Here is my gloriously brass ceiling fan with the blades removed. I also removed the light shades and light bulbs.

First, tape closely around the base of the fan with masking tape.

Next, start taping layers of newspapers up to the ceiling around the fan. I spread them out to about three feet on each side of the fan. I also let the ends hang down a bit to create a shield for the rest of the ceiling. This helps prevent any stray paint dust or spray from getting all over your ceiling.

I also taped over the light sockets- you can spray the outside white part of them, but don't spray the inside. Spray light coats on the fan, being careful to get into all the nooks and crannies. The all-directions type of spray paint can works best for this. Spray in short bursts and be careful not to spray too much at once or you'll get drips. You may even want to do a second coat- it's easy to miss a spot or two.


Hooray! No more brass shiny monster. This oil-rubbed bronze color is much more appropriate for our old Victorian house. I know they had brass fixtures back then, but by our era, they have a nice patina and it looks pretty kitschy if they're shiny. So, there you have it: an easy way to pretty up your ceiling fans without having to take them off of the ceiling!

Is it ok to spray into the fan area? kimhinte@gmail.com I just purchased a used fan because I am divorced and renting I have a fan in the entry but its a 1912 house and very dark. I purchased a good deal on craiglists for a fan with five lights I want oil bronzed or bronze. when you sprayed did you worry about the motor? Thanks
ReplyDeleteHi, Kim! I was careful to spray lightly near the motor, but if you are concerned about it, you can cover the area with masking tape to be sure that you don't get any paint into it. If you are left with a mesh panel that is an unsightly color, you can find a craft paint that is similar to the oiled bronze and hand paint it with a brush. I can't say that I'm a professional or an electrician (and as with all DIY projects, it's "do at your own risk") but I've painted two fans and had them for over a year and they are working fine.
DeleteThanks for the question- it's always helpful to have another person with questions make me think about a project even more!
I think this is one of the most significant information for me.
ReplyDeleteCeiling Fan
This is my first time i visit here. I found so many interesting stuff in your blog especially its discussion. From the tons of comments on your articles, I guess I am not the only one having all the enjoyment here! keep up the good work
ReplyDeleteCeiling Fan
This sort of article is fascinating and enjoyable to peruse. I cherish perusing and I am continually hunting down useful data like this. Home Window Cleaning
ReplyDeleteSuperlative style of writing that every new blogger aspires to have.
ReplyDeleteAlice Le T